APEX as a PWA: Part 4
Part 4: Installing an APEX App into a Mobile Device
This blog post series intends to cover everything there is to know about turning an APEX application into a Progressive Web App.
This documentation is also available on GitHub.
APEX as a PWA: The Complete Guide
- Part 1: Introducing Progressive Web Apps
- Part 2: Setup and Development Tips
- Part 3: JavaScript Recap
- Part 4: Installing an APEX App into a Mobile Device
- Part 5: Using an APEX App Offline
- Part 6: Handling Background Sync
- Part 7: Sending Push Notifications
- Part 8: Final Thoughts
Part 4: Table of Content
Characteristics
Installing an APEX app on a mobile device is likely the easiest part of building a PWA. It's also a very quick win towards enhancing the mobile experience, because having an APEX application sitting on a mobile device home screen will increase user engagement substantially.
It's always easier to reach for an icon than reaching for a browser bookmark.
We are not adding our APEX application to the App Store or Google play. You can use Cordova to build an hybrid app like that. A PWA offers an installation button within the app itself. When clicked, the PWA proceeds to install itself on the device, and the button disappears as it's no longer necessary.
Preview:

Observations:
- User clicks on a button
Install this appin an APEX application - Confirmation window appears, asking to add this app to the home screen
- User clicks "Add to Home Screen"
- The PWA proceeds to install itself and adds an icon to the home screen
- User clicks the icon on the home screen
- Splash screen appears, like a native app
- APEX application opens in full screen
Architecture
What we need is to create a special file called manifest.json. It has to be called manifest.json for the browser to recognize the purpose of this file properly.
As indicated in Part 2, the manifest.json file must be located at the root level of the APEX server. Example: https://localhost:31810/manifest.json.
manifest.json
Here's an example of a typical manifest.json file, as shown here.
{
  "name": "APEX as a Progressive Web App",
  "short_name": "APEX PWA",
  "start_url": "http://localhost:31810/ords/f?p=1694:1",
  "display": "standalone",
  "orientation": "portrait-primary",
  "background_color": "#fff",
  "theme_color": "#3f51b5",
  "description": "An example of APEX as a Progressive Web Application",
  "dir": "ltr",
  "lang": "en-US",
  "gcm_sender_id": "103953800507",
  "icons": [
    {
      "src": "./images/icons/icon-72x72.png",
      "type": "image/png",
      "sizes": "72x72"
    },
    {
      "src": "./images/icons/icon-96x96.png",
      "type": "image/png",
      "sizes": "96x96"
    },
    {
      "src": "./images/icons/icon-128x128.png",
      "type": "image/png",
      "sizes": "128x128"
    },
    {
      "src": "./images/icons/icon-144x144.png",
      "type": "image/png",
      "sizes": "144x144"
    },
    {
      "src": "./images/icons/icon-152x152.png",
      "type": "image/png",
      "sizes": "152x152"
    },
    {
      "src": "./images/icons/icon-192x192.png",
      "type": "image/png",
      "sizes": "192x192"
    },
    {
      "src": "./images/icons/icon-384x384.png",
      "type": "image/png",
      "sizes": "384x384"
    },
    {
      "src": "./images/icons/icon-512x512.png",
      "type": "image/png",
      "sizes": "512x512"
    }
  ]
}
| Property | Description |
|---|---|
| short_name | The name of your application, as shown on the home screen icon |
| name | The name of your application, as shown on the splash screen |
| start_url | The URL of your application |
| display | Controls the UI of your PWA. Options are: fullscreen, standalone, minimal-ui, browser. More info here |
| orientation | Controls the orientation of your PWA. Options are: any, natural, landscape, landscape-primary, landscape-secondary, portrait, portrait-primary, portrait-secondary |
| background_color | Controls the background color of your PWA splash screen |
| theme_color | Controls the color of the mobile task bar while navigating your application (Android) |
| description | When opening a PWA, the description is shown during the splash screen |
| dir | Controls the direction of your PWA. Options are : ltr, rtl |
| lang | Specifies the name and short_name. Example: en-US |
| gcm_sender_id | Used to subscribe to push notifications. This is a hard coded value. Do not change. |
| icons | List of icons for your PWA, depending on the context |
Referencing manifest.json in APEX
When manifest.json is completed and uploaded to the root of the APEX server, we still have to reference it in APEX.
The following tip is some kind of a hack. In the APEX Shared Components under User Interface Attributes, there is a section called Favicon HTML. The purpose of this field is to inject the different app icons into the <head></head> section of an HTML page.
Coincidentally, manifest.json also needs to go in the <head></head> section, so we'll leverage the Favicon field to reference our file, even if it's not an icon:
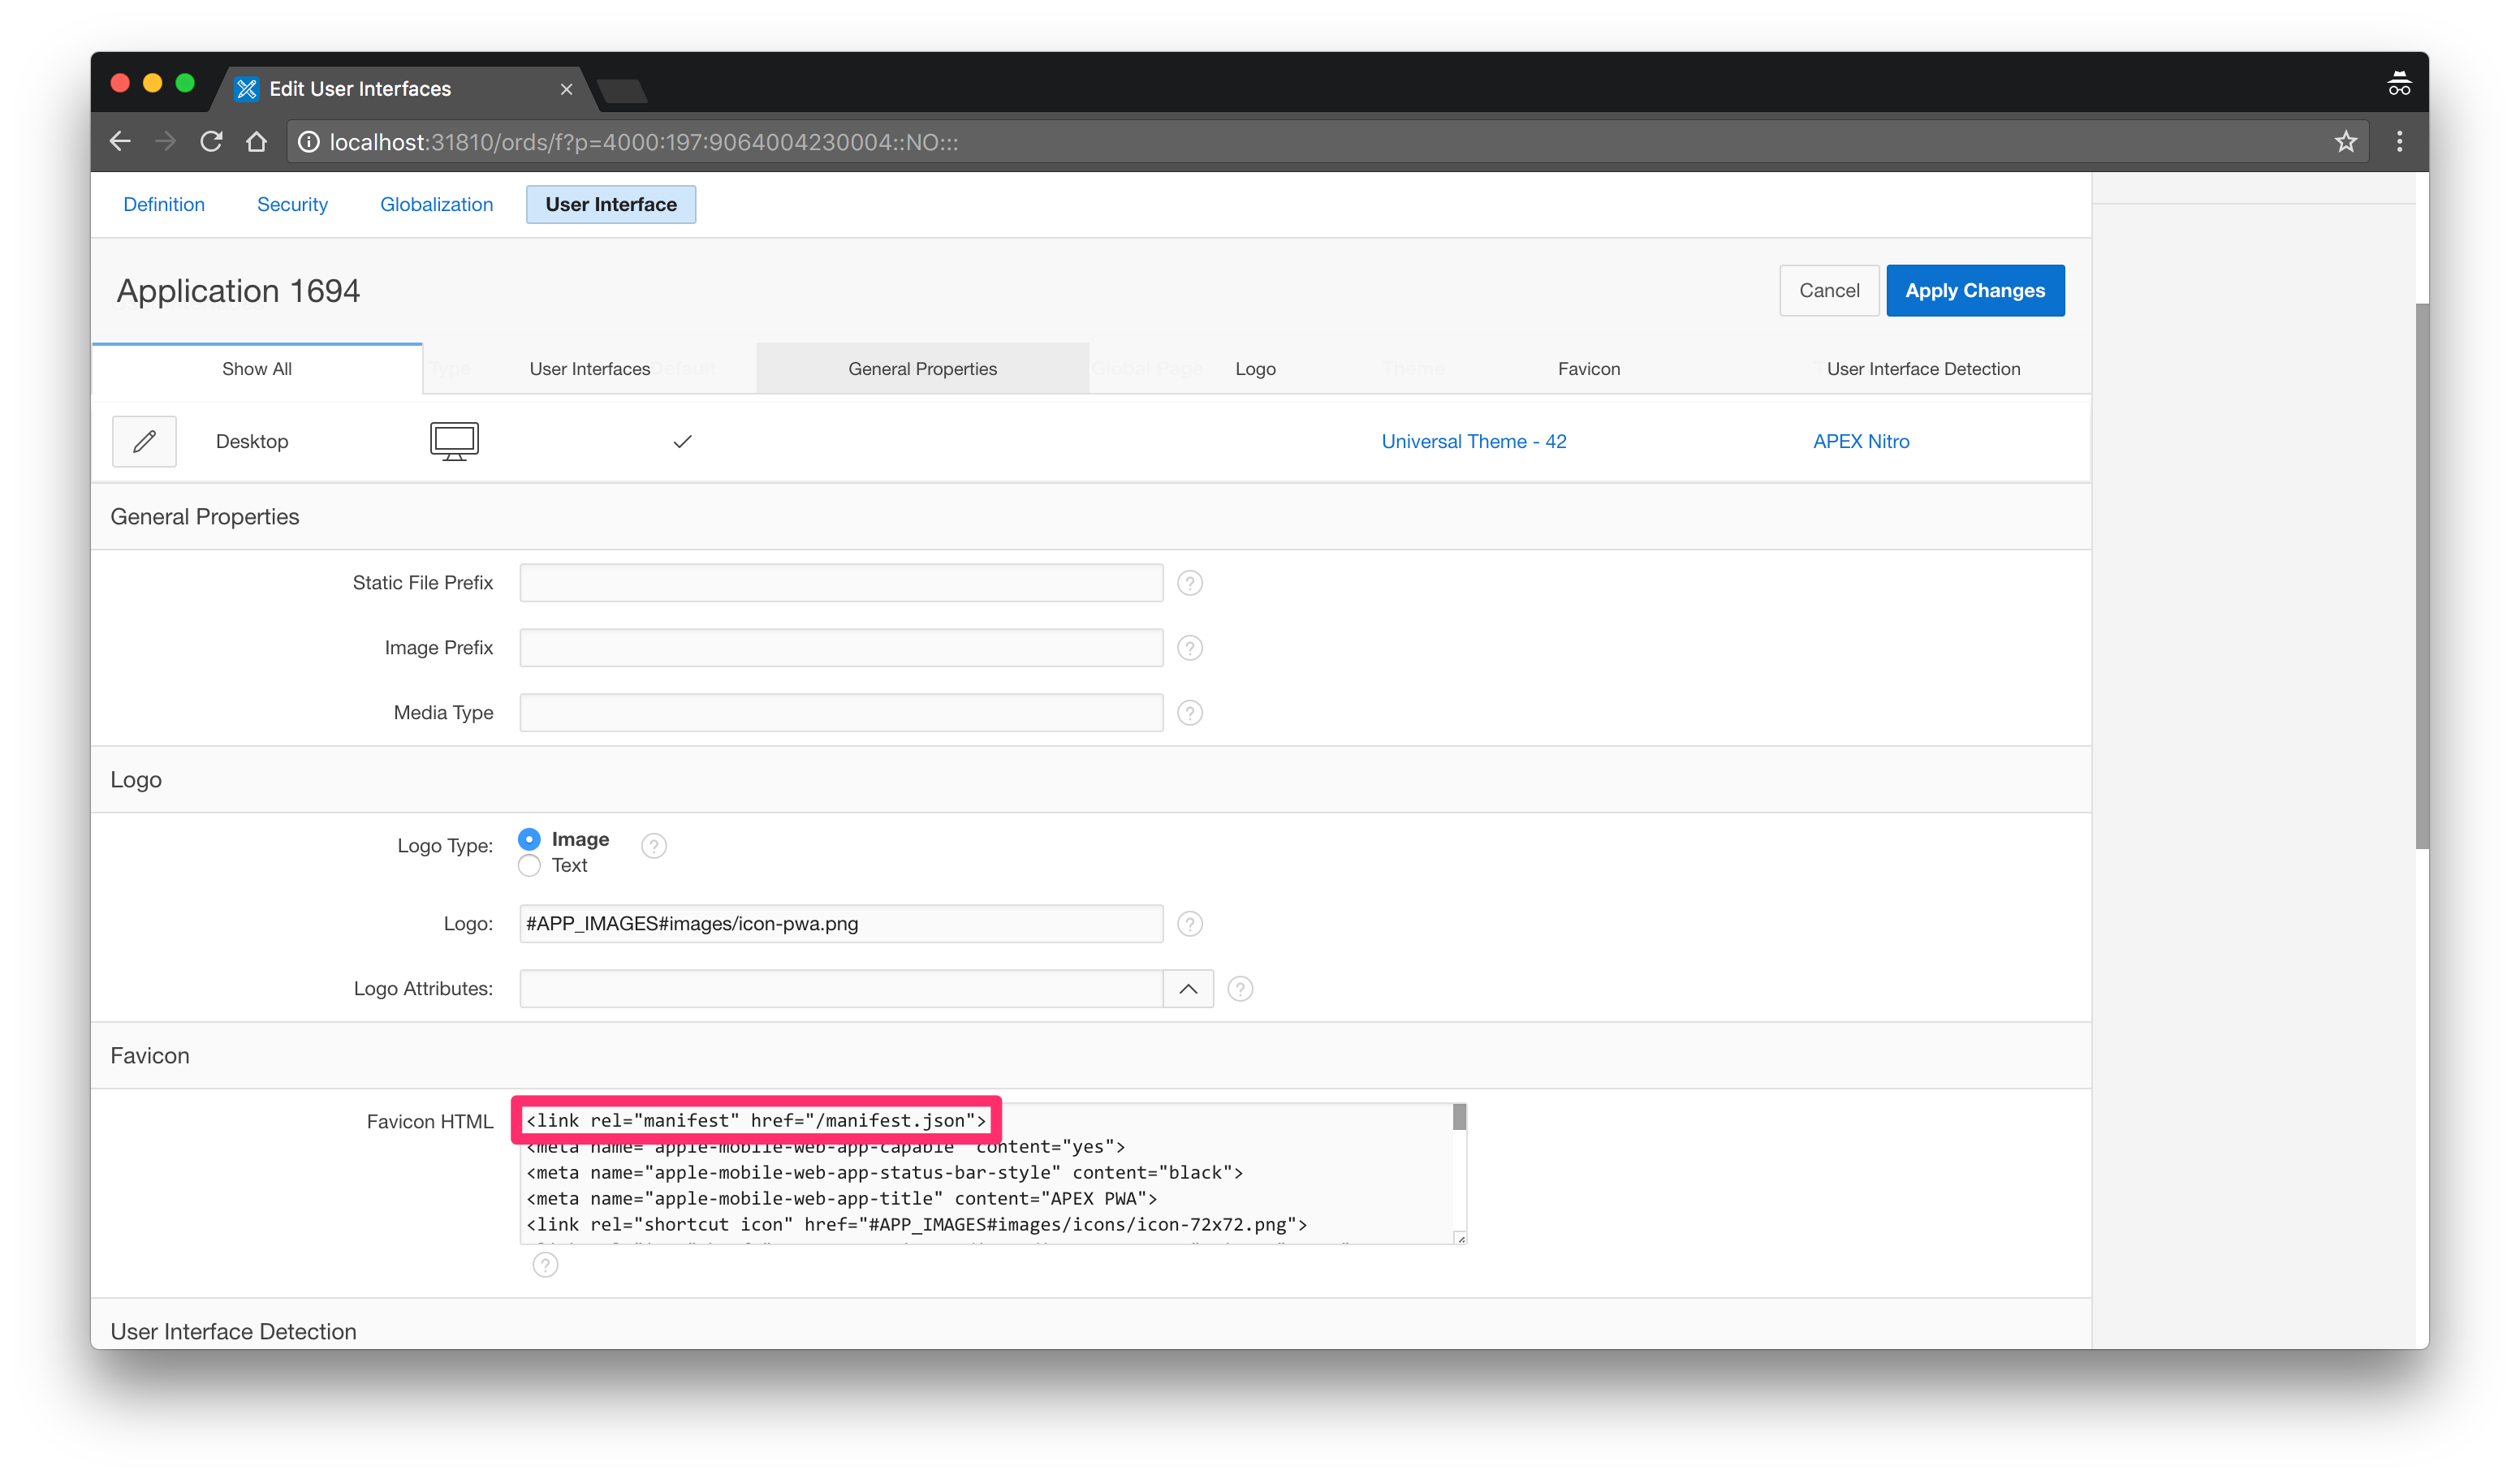
Favicon HTML code:
<link rel="manifest" href="/manifest.json">
<meta name="apple-mobile-web-app-capable" content="yes">
<meta name="apple-mobile-web-app-status-bar-style" content="black">
<meta name="apple-mobile-web-app-title" content="APEX PWA">
<link rel="shortcut icon" href="#APP_IMAGES#images/icons/icon-72x72.png">
<link rel="icon" href="#APP_IMAGES#images/icons/icon-72x72.png" sizes="72x72">
<link rel="apple-touch-icon" href="#APP_IMAGES#images/icons/icon-72x72.png" sizes="72x72">
<link rel="apple-touch-icon" href="#APP_IMAGES#images/icons/icon-96x96.png" sizes="96x96">
<link rel="apple-touch-icon" href="#APP_IMAGES#images/icons/icon-128x128.png" sizes="128x128">
<link rel="apple-touch-icon" href="#APP_IMAGES#images/icons/icon-144x144.png" sizes="144x144">
<link rel="apple-touch-icon" href="#APP_IMAGES#images/icons/icon-152x152.png" sizes="152x152">
<link rel="apple-touch-icon" href="#APP_IMAGES#images/icons/icon-192x192.png" sizes="192x192">
<link rel="apple-touch-icon" href="#APP_IMAGES#images/icons/icon-384x384.png" sizes="384x384">
<link rel="apple-touch-icon" href="#APP_IMAGES#images/icons/icon-512x512.png" sizes="512x512">
<meta name="msapplication-TileImage" content="#APP_IMAGES#images/icons/icon-144x144.png">
<meta name="msapplication-TileColor" content="#fff">
<meta name="theme-color" content="#3f51b5">
<script>
var appImages = '#APP_IMAGES#';
</script>
All these meta and link tags are for used for compatibility purposes across all platforms.
At the end of the code we are declaring a JavaScript global variable (appImages) which will be used later in external JavaScript files.
Adding an "Install" Button to an APEX App
To install an APEX application from the APEX application itself, we need an install button somewhere. I find that having this button on the navigation bar makes sense, it can be placed anywhere.
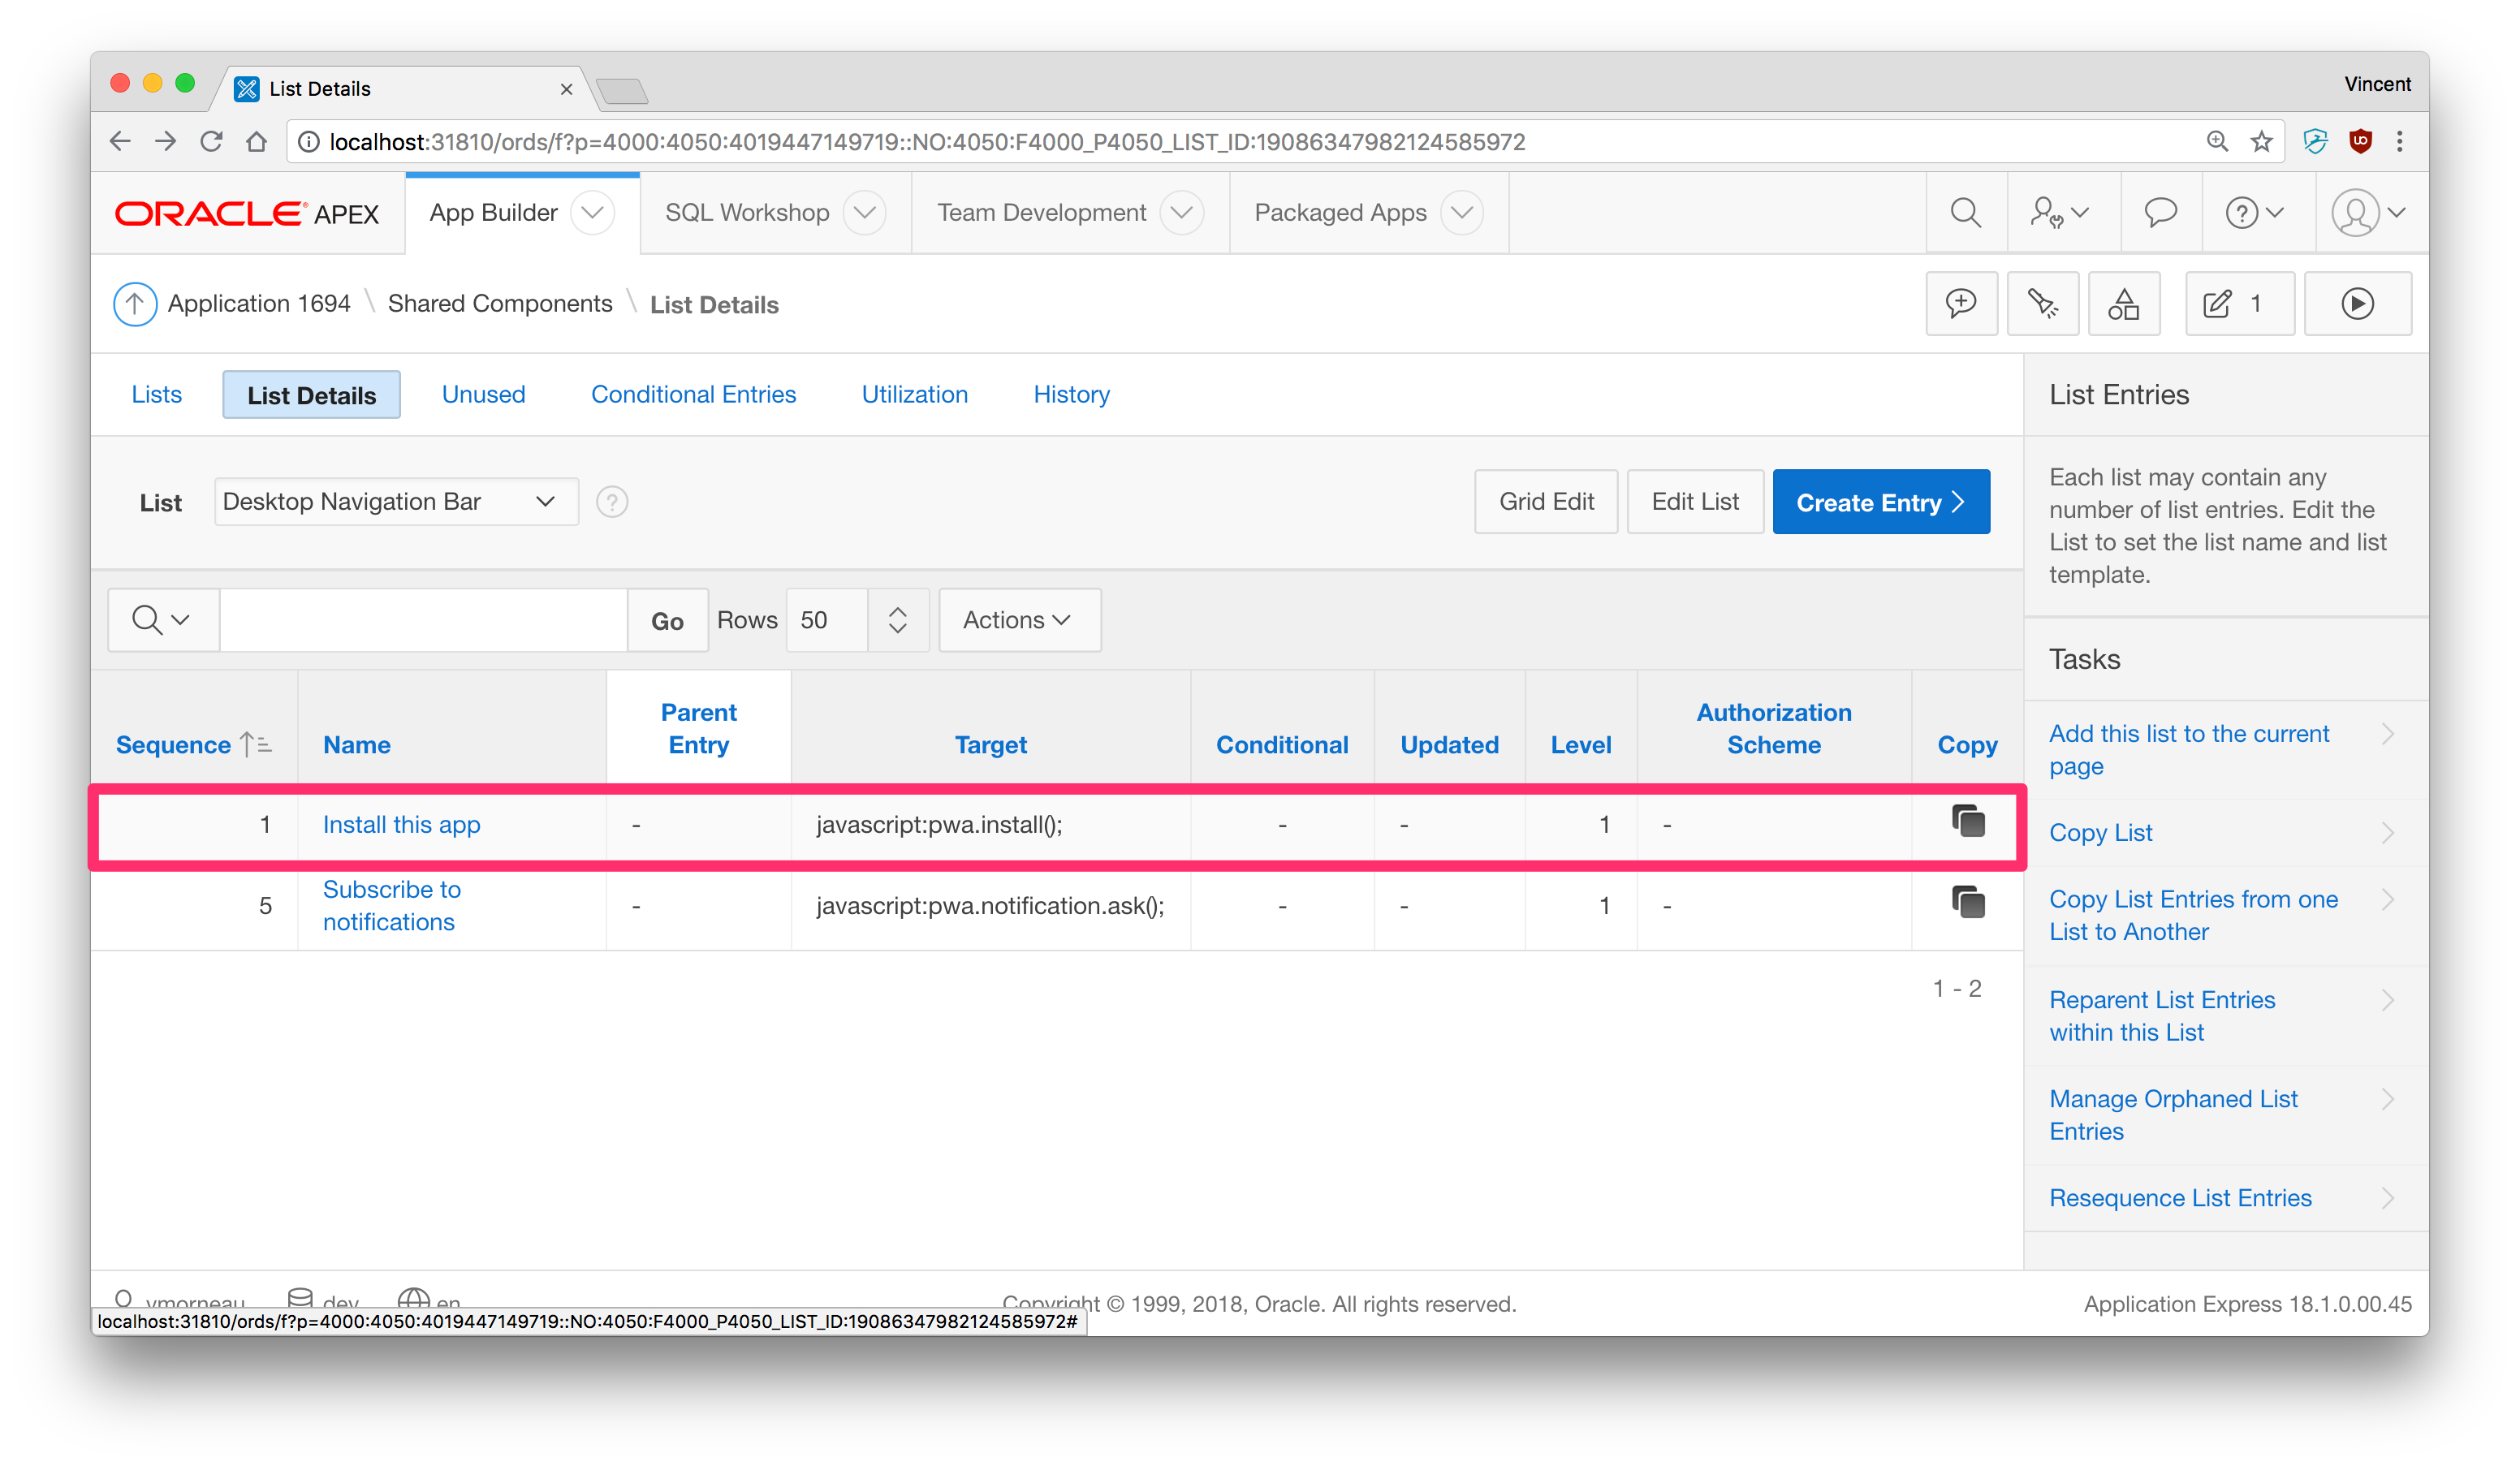
This button has to do two things:
- When clicked, invoke a JavaScript function to start the installation code. Example:
pwa.install();. More on this later. - Has a class so we can control the display of the button (hide and show). Example
pwa-install-btn:

Installation Criteria
Before a PWA is eligible to install itself locally on a device, the browser has to recognize a few criteria:
| Criteria | Description |
|---|---|
| Not already installed | The web app is not already installed |
| User engagement | Meets a user engagement heuristic (currently, the user has interacted with the domain for at least 30 seconds) |
| Web app manifest | Includes a web app manifest that includes: name, icons, start_url, display must be full screen |
| Security | Served over HTTPS (required for service workers) |
| Service worker | Has registered a service worker with a fetch event handler |
Source: Google
Installation Prompt
When the criteria above are met, the browser will trigger an event called beforeinstallprompt which will automatically launch the installation prompt. This can happen very fast (within 30 seconds of navigating the app), so I think it's better to execute the beforeinstallprompt event on a button click rather than spamming the user.
To store the event and execute the installation later, we will use this technique:
/* === #APP_IMAGES#js/app.js === */

// Global variable used to store the beforeinstallprompt event
var installPrompt;

// This event will be triggered after installation criteria are met
window.addEventListener('beforeinstallprompt', function (event) {
  // Stop the automatic installation prompt
  event.preventDefault();
  // Store the event in a global variable so it can be triggered later
  installPrompt = event;
  // Controls the display (hide and show) of the PWA buttons
  pwa.ui.refresh();
});

// This event will be triggered after the app is installed
window.addEventListener('appinstalled', function (event) {
  apex.debug.log('App was installed', event);
});
The code above stores the installation event and makes the installation button appear in the navigation bar. As indicated earlier, the installation button invokes pwa.install, which is executes the following code:
/* === #APP_IMAGES#js/app.js === */

pwa.install = function() {
  // Show the installation prompt, using the global variable previously set
  installPrompt.prompt();
  // Wait for the user to respond to the prompt
  installPrompt.userChoice
    .then(function(choiceResult) {
      apex.debug.log('User ' + choiceResult.outcome + ' to install the app');
      // Reset the install prompt
      installPrompt = null;
      // Hide the install button
      pwa.init.ui();
    });
};
After the user accepts the installation prompt, the app will be added to the device's home screen.
Using the Installed App
Clicking on the new icon will now launch a separate browser instance. Depending on the display value of the manifest.json, it is possible to hide the browser UI. For instance, standalone mode hides any standard browser UI elements like the URL bar, previous/next buttons, etc.
Opening the PWA will display a beautiful splash screen while the application is loading, from which you have total control with the rest of the manifest.json properties.
After the app has been installed, the button will disappear.
With an icon on the home screen and the APEX app opening in full screen, we are now one step closer to a native mobile experience. Let's continue to Part 5: Using an APEX App Offline to start learning about Service Workers, which are the driving force of PWA.