Fetch API for Oracle APEX - Part 2: Securing Endpoints


Fetch API series:
This is a follow-up to my previous blog post: Using the Fetch API in Oracle APEX. In that post, I explained how to fetch data from an ORDS endpoint and display it as a regular APEX template (example using cards).
I used simple examples to explain the concepts around the Fetch API and apex.util.applyTemplate. But in the real world we rarely expose data via unsecured REST like on my previous post. In this blog post I will explain how to secure your endpoints and use the Fetch API through an APEX session.
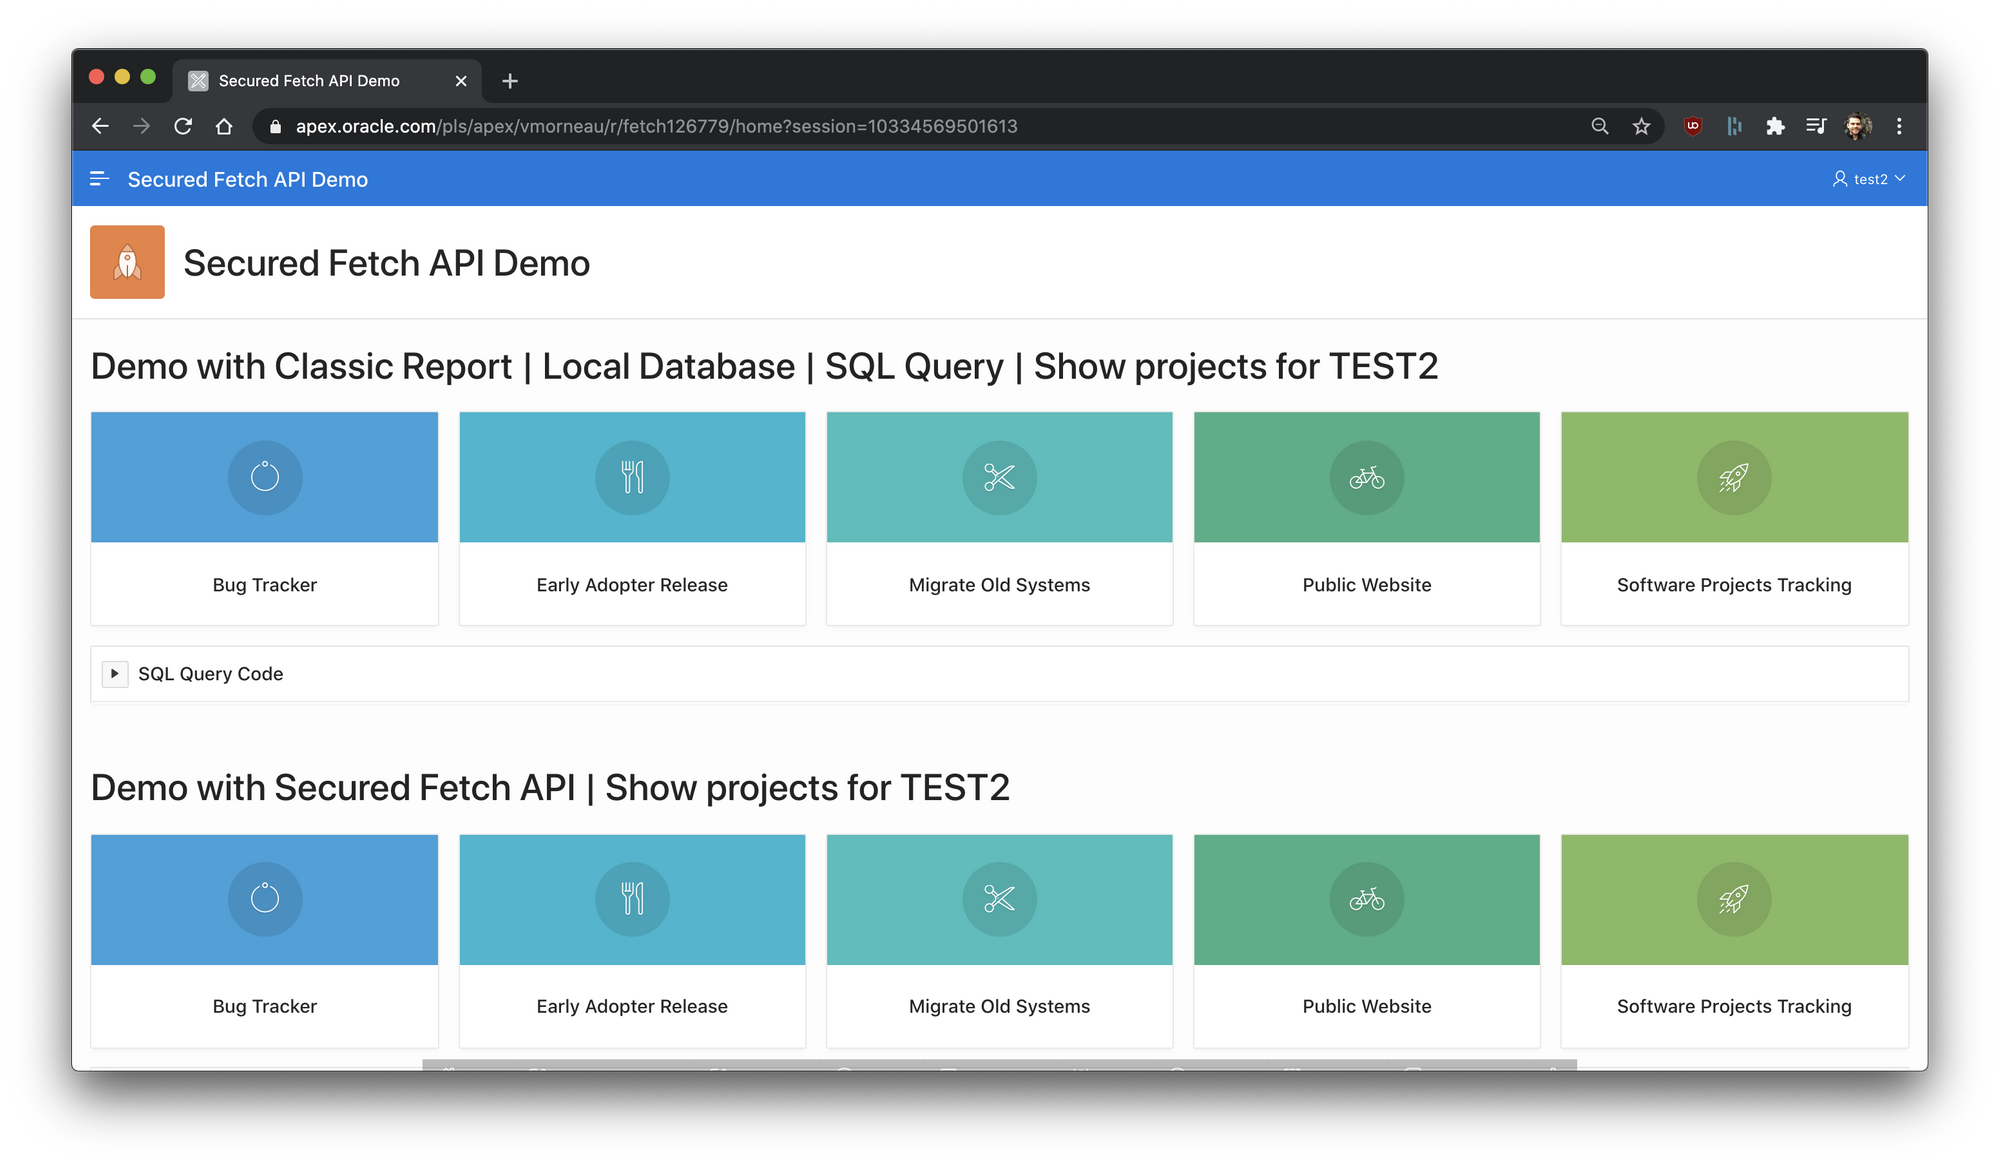
Demo app here. Use login test1, test2 or test3 with any password to login. The project cards are returning different results depending on which user logs in. A comparison is made between a regular classic report and a secured Fetch call.
Why secure the Fetch API
- You certainly don't want anyone requesting data from your endpoints.
- You may want to filter the data based on who makes the request
How to secure the Fetch API
We will configure a very easy OAuth setup that revolves around the APEX Session of a user of your application.
The goal of our little demo: display the projects that are linked to user test1, test2 or test3.
Prerequisite: DDL for demo
First of all, here's the structure we are going to use for this demo.
create table projects (
  id number not null enable
	, project varchar2(30) not null enable
	, icon_css_classes varchar2(50)
	, created timestamp (6) with local time zone
	, created_by varchar2(255)
)
/

insert into projects (id, project, icon_css_classes, created, created_by) values (1, 'Maintain Support Systems', 'fa-awesome-face fa-lg', localtimestamp, 'TEST1');
insert into projects (id, project, icon_css_classes, created, created_by) values (2, 'Load Software', 'fa-dot-circle-o fa-lg', localtimestamp, 'TEST1');
insert into projects (id, project, icon_css_classes, created, created_by) values (3, 'Email Integration', 'fa-hand-grab-o fa-lg', localtimestamp, 'TEST1');
insert into projects (id, project, icon_css_classes, created, created_by) values (4, 'Documentation', 'fa-ambulance fa-lg', localtimestamp, 'TEST1');
insert into projects (id, project, icon_css_classes, created, created_by) values (5, 'Training', 'fa-credit-card fa-lg', localtimestamp, 'TEST1');
insert into projects (id, project, icon_css_classes, created, created_by) values (6, 'Bug Tracker', 'fa-spinner fa-lg', localtimestamp, 'TEST2');
insert into projects (id, project, icon_css_classes, created, created_by) values (7, 'Migrate Old Systems', 'fa-scissors fa-lg', localtimestamp, 'TEST2');
insert into projects (id, project, icon_css_classes, created, created_by) values (8, 'Software Projects Tracking', 'fa-rocket fa-lg', localtimestamp, 'TEST2');
insert into projects (id, project, icon_css_classes, created, created_by) values (9, 'Public Website', 'fa-bicycle fa-lg', localtimestamp, 'TEST2');
insert into projects (id, project, icon_css_classes, created, created_by) values (10, 'Early Adopter Release', 'fa-cutlery fa-lg', localtimestamp, 'TEST2');
insert into projects (id, project, icon_css_classes, created, created_by) values (11, 'Environment Configuration', 'fa-flask fa-lg', localtimestamp, 'TEST3');
insert into projects (id, project, icon_css_classes, created, created_by) values (12, 'Customer Satisfaction Survey', 'fa-hashtag fa-lg', localtimestamp, 'TEST3');
insert into projects (id, project, icon_css_classes, created, created_by) values (13, 'Convert Excel Spreadsheet', 'fa-shield fa-lg', localtimestamp, 'TEST3');
insert into projects (id, project, icon_css_classes, created, created_by) values (14, 'Upgrade Equipment', 'fa-tags fa-lg', localtimestamp, 'TEST3'); Step 1: Setting up ORDS for secure access
Create ORDS roles and privileges which will be used to allow a client (user) to access specific endpoints.
-- Create roles
begin
  ords.create_role(
    p_role_name => 'secured_role' -- or any name
  );

  commit;
end;
/

-- Create privilege
declare
  l_roles_arr owa.vc_arr;
  l_patterns_arr owa.vc_arr;
begin
  l_roles_arr(1) := 'secured_role';
  l_patterns_arr(1) := '/secured/*'; -- matches your ORDS URI Template

  ords.define_privilege (
    p_privilege_name => 'secured_priv', -- or any name
    p_roles => l_roles_arr,
    p_patterns => l_patterns_arr
  );

  commit;
end;
/
Note: /secured/* is an ORDS URI Template that we will be creating in Step 2.
Step 2: Create an ORDS Secured Endpoint
Create ORDS module, URI template, Resource Handler as follow:
RESTful Service Module: secured
Module Base Path: /secured/
URI Template: projects/
Full URL: https://apex.oracle.com/pls/apex/vmorneau/secured/projects/
Method: GET
Source Type: Collection Query
Source:
select p.id
  , p.project card_title
  , p.icon_css_classes card_icon
from user_ords_clients uoc
join projects p on p.created_by = uoc.name
and uoc.client_id = :current_user
order by card_title
This is where our SQL gets a little different from the classic report. Because we have created a ORDS privilege in step 1, all templates in `/secured/*` such as `/secured/projects/` will require OAuth authentication. If the authentication is successful (see Step 5), then we are able to identify the user with `client_id = :current_user`.
Step 3: Getting an OAuth token for your APEX Session
The following is very important. We will generate an OAuth token after the user has authenticated.
Create an `Application Process - After Authentication`
declare
l_count number;
l_client_id user_ords_clients.client_id%type;
l_client_secret user_ords_clients.client_secret%type;
begin
-- count number of OAuth clients that matches current user
select count(1)
into l_count
from user_ords_clients
where lower(name) = lower(:app_user);
-- if OAuth does not exist, records OAuth record for current user
if l_count = 0 then
oauth.create_client(
p_name => :app_user
, p_grant_type => 'client_credentials'
, p_support_email => 'support@yourdomain.com'
, p_privilege_names => 'secured_priv'
);
oauth.grant_client_role(
p_client_name => :app_user
, p_role_name => 'secured_role'
);
commit;
end if;
-- get client_id and client_secret for OAuth
select client_id, client_secret
into l_client_id, l_client_secret
from user_ords_clients
where lower(name) = lower(:app_user);
-- authenticate the current user for OAuth
-- CHANGEME: replace with your ORDS schema alias
apex_web_service.oauth_authenticate(
p_token_url => apex_util.host_url('APEX_PATH')||'CHANGEME/oauth/token'
, p_client_id => l_client_id
, p_client_secret => l_client_secret
);
-- get the OAuth token used for authentication
-- which will live for the current APEX session
-- store the token on page 0 so we can use it anywhere
:p0_oauth_token := apex_web_service.oauth_get_last_token;
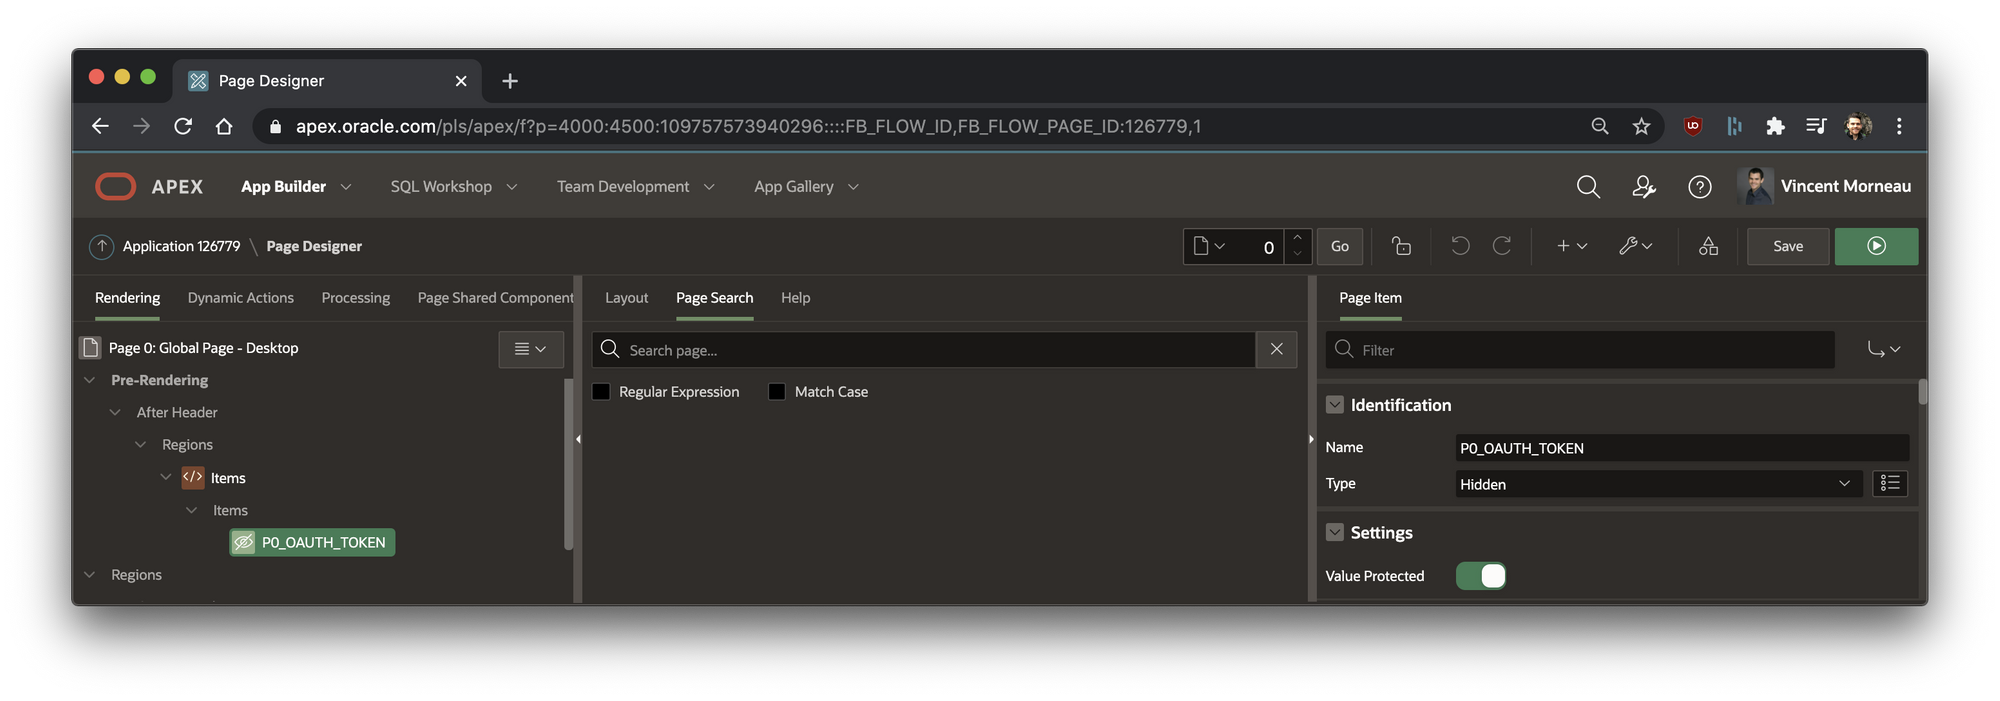
end;After authentication, `P0_OAUTH_TOKEN` will contain a valid token, which we will use later with the Fetch API.
Step 4: Create P0_OAUTH_TOKEN
As shown in Step 3, I use a page 0 item to store the OAuth token, which will be valid for the current APEX Session. Make sure to create it on page 0.
The default lifetime a OAuth token is 1 hour. If the APEX session goes beyond the token lifetime, you'll have to request a new token by re-authenticate using `apex_web_service.oauth_authenticate`. Basically run the same code as Step 3 to get a new token.
Step 5: Add JavaScript to your page Function and Global Variable Declaration
In my previous blog post, the way we invoked the Fetch API was very simple:
const request = fetch('https://something.com/i/need/right/now')With added OAuth, it looks like this:
let headers = new Headers();
headers.append("Authorization", `Bearer ${apex.item("P0_OAUTH_TOKEN").getValue()}`);

const requestOptions = {
  method: "GET",
  headers: headers,
  redirect: "follow"
};

const request = await fetch('https://something.com/i/need/right/now', requestOptions)
Complete JavaScript to your page Function and Global Variable Declaration:
const doFetch = async () => {
  let headers = new Headers();
  headers.append("Authorization", `Bearer ${apex.item("P0_OAUTH_TOKEN").getValue()}`);

  const requestOptions = {
    method: "GET",
    headers: headers,
    redirect: "follow"
  };

  const requestURL = '/pls/apex/vmorneau/secured/projects/'; // CHANGEME

  // Fetches an ORDS endpoint (GET)
  const request = await fetch(requestURL, requestOptions)
  // Turns the request into readable text
  const response = await request.text();
  // Turns into a JSON object for easier manipulation of the data
  const data = JSON.parse(response);

  // Design the card template we want to build
  const templateBeforeRows = `<ul class="t-Cards u-colors t-Cards--featured t-Cards--block force-fa-lg t-Cards--displayIcons t-Cards--5cols t-Cards--animColorFill t-Cards--hideBody">`;
  const template = `
  <li class="t-Cards-item #CARD_MODIFIERS#">
    <div class="t-Card">
      <div class="t-Card-wrap">
        <div class="t-Card-icon u-color #CARD_COLOR#"><span class="t-Icon fa #CARD_ICON#"><span class="t-Card-initials" role="presentation">#CARD_INITIALS#</span></span></div>
        <div class="t-Card-titleWrap"><h3 class="t-Card-title">#CARD_TITLE#</h3><h4 class="t-Card-subtitle">#CARD_SUBTITLE#</h4></div>
        <div class="t-Card-body">
          <div class="t-Card-desc">#CARD_TEXT#</div>
          <div class="t-Card-info">#CARD_SUBTEXT#</div>
        </div>
        <span class="t-Card-colorFill u-color #CARD_COLOR#"></span>
      </div>
    </div>
  </li>
  `;
  const templateAfterRows = `</ul>`;

  // Append the Cards wrapper (before and after rows) to a region on our page
  apex.jQuery("#RegionFetchAPI").append(templateBeforeRows);
  apex.jQuery("#RegionFetchAPI").append(templateAfterRows);

  /**
   * Turns an object coming from an ORDS request into a usable placeholder for apex.util.applyTemplate
   * @param {object} item - Object from an ORDS request
   **/
  const getPlaceholders = item => {
    let placeholders = {};

    for (let key in item) {
      placeholders[key.toUpperCase()] = item[key];
    }

    return placeholders;
  };

  // Append the rows coming from ORDS
  data.items.forEach(item => {
    let options = { placeholders: getPlaceholders(item) };
    let result = apex.util.applyTemplate(template, options);
    apex.jQuery("#RegionFetchAPI .t-Cards").append(result);
  });
};
Step 6: Add JavaScript to your page Execute when Page Loads
And of course, execute the JavaScript function on page load:
doFetch();So that's it. Now I know what you're thinking: this is madness, this is much more complicated than a classic report. Yes you are right, but that's not the point.
For a single simple report like my demo app, this is clearly not worth it. However, in large applications where a SQL query (report) can be reused in a dozen places, then your entire ORDS & JavaScript setup can be reused to output a report using a single line of code.
I'm also very upfront about my love for front-end. I find it much more enjoyable to have the flexibility of tweaking JavaScript templates, without having to change 10 different reports and 25 template options.
The code I have laid out here is always wrapped in files, and mostly segregated in smaller functions for maximum reusability.
Next up, I'll look into refactoring my usage of `apex.util.applyTemplate` after John Snyder's advice.
Good stuff! You could throw the data into an apex.model and get the pagination benefits via tableModelView widget. Still uses applyTemplate. See model option callServer (undoc'ed) to hook directly into fetch.
— John Snyders (@J_Snyders) January 5, 2021